A wireframe is a set of connecting lines between landmarks in a graph that helps the viewer to visualize the landmark configuration. MorphoJ, like other morphometrics software, supports diagrams using wireframes for visualizing shape changes in two or three dimensions. In addition to the conventional wireframes in which all the links are represented as straight links, MorphoJ also can produce 'soft' wireframes, in which the straight links between the landmarks are deformed using the thin-plate spline.
A most important step in producing wireframe diagrams that are helpful to the viewer is to select those links between landmarks that should be represented by lines. This requires some understanding of the anatomy of the structure under study, and therefore cannot be dine automatically. MorphoJ assists users by offering a graphical interface for creating or editing wireframes.
To create a new wireframe, click on a dataset in the Project Tree window, and then select Create or Edit Wireframe in the Preliminaries menu. A new graphics tab entitled "Create wireframe" will come to the foreground.
To edit an existing wireframe, click on the wireframe in the Project Tree window, and then select Create or Edit Wireframe in the Preliminaries menu. A new graphics tab entitled "Edit wireframe" will come to the foreground, which will show the links in the existing wireframe. Otherwise, this interface is the same as that for creating a new wireframe.
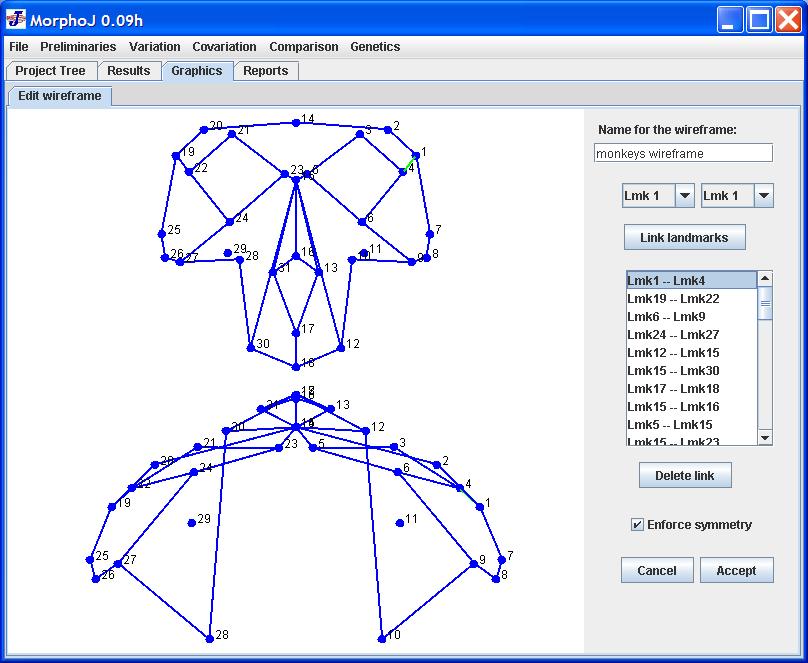
The following example shows the interface for editing a wireframe (the example is imported from the Morphologika example file kindly posted on the web by Paul O'Higgins):
To the left of the panel, there are two diagrams with different views of the landmark configuration (just one diagram for two-dimensional data). These views can be changed by invoking the pop-up menu for the respective diagram (e.g. changing axes, rotating).
To the right, there are several additional items. The first is a text field for entering a name for the wireframe. Below it, there are two pull-down menus, each with the list of landmarks in the configuration, and a button labeled Link landmarks below them.
The biggest item to the right is the list of existing links. The links that are selected in this list appear as green rather than blue lines in the diagrams to the left (but note that lines can fall on top of each other in a diagram, and the selected links may thus be hidden, as in the lower of the two diagrams in the example).
Clicking the Delete link button will remove all the links that are selected in the list.
The check box labeled Enforce symmetry is only visible for landmark configurations with object symmetry. If it is selected, adding or removing links will be done in a way that reflects the symmetry of the configuration. If a link includes one or two paired landmarks, it will be added or deleted on both sides of the configuration.
The Cancel button is to abort the procedure: the panel will close and no wireframe will be created or modified. Clicking the Accept button will finish the wireframe and either update it with the new links or add it as a new item to the project tree.
A new link between two landmarks can be added in two ways: either by clicking on one landmark point in the diagram and dragging to another point, or by selecting the two points with the pull-down menus and clicking the button "Link landmarks".
While dragging the mouse, the first landmark point should turn green - if this does not happen, the user did not click exactly within the dot representing the first landmark, and no link will be drawn. If this happens and the user finds it too difficult to hit the landmark points, it is possible to use "Resize Landmark Points" in pop-up menu of the diagram to resize the dots, which also increases the area within which the mouse position is linked to each landmark.
Links must be deleted with the Delete link button, but they can be selected either with the list interface or by dragging the mouse from one to the other end of an existing link in the diagram.