FileConverter is a utility program for converting the output files produced with the MicroScribe digitizer to a single text file readable by morphometrics software such as MorphoJ.
When collecting data with the MicroScribe, it is convenient to save the data of each specimen in a separate file. Often, it is necessary to digitize landmarks from two different views of the same specimen (e.g. dorsal and ventral views), and if there are many landmarks per specimen, it can be convenient to save a separate file for each view. As a result, you will end up with numerous files, which need to be combined into a single file for import into software for morphometric or statistical analysis. FileConverter is designed to do just that.
If data have been collected from two different views of an object, such as the dorsal and ventral views of a skull, FileConverter can combine them into a single configuration of landmarks. This is done by translating and rotating the landmarks of one view so that they fit to those of the reference view (at least three landmarks must be digitized from both views).
The output is a single tab-delimited text file. Each line contains the data for one object, starting with an identifier derived from the file name of the respective input file or files (without the file name extension or identifying strings for the views).
To download the Windows installer for FileConverter, click here.
The file FileConverter-install.exe.zip is a compressed file that contains an installer routine. To use it, first un-zip the file (if you have a really clever browser, the downloaded file might be un-zipped automatically and appear as FileConverter-install.exe straight away...). Then double-click on the file FileConverter-install.exe to invoke the installer, which will guide you through the procedure for setting up FileConverter on your computer.
The data collected by the MircoScribe are saved as .CSV (comma-separated values) or .TXT (tab-delimited text) files in a folder. In these files, the x, y, and z coordinates of each landmark are in the first three columns of each line, on a different line for each landmark. No other entries should be in the file. The two views of each object can either be in the same file or in two different files (in that case, the names of the files with the two views for each object must be identical except for an identifying string of one or more characters).
Each time you run FileConverter, it reads all the files in a single folder. That means you should assemble an input folder with all the files with data that should go into the same output file. Moreover, the input folder must not contain any files other than those with coordinates, which FileConverter should open.
After the installation, the program can then be invoked from the Start menu (All Programs). The following interface will appear:
The first question is whether matching of different views is required or not.
In the simplest case, all landmarks have been digitized from the same view of the specimen without moving it. In this case, click on the button No matching required, as in the screen shot above. This will disable the interface for specifying the matching scheme, which takes up most of the upper half of the interface.
The bottom of the dialog box presents the interface for selecting the folder with the data files. After clicking the Open button, the following new dialog box will appear, in which the user can specify the output file and which is described below.
If the landmarks of each specimen have been digitized from two different views, matching is required. If the user clicks the button Matching of different views required, the middle part of the interface is activated.
The next choice is whether the data from the two views of each specimen are in the same file or in two separate files.
If a single file for both views is used, click on the button labeled Each file contains all landmarks, which will activate the three text input fields below the button:
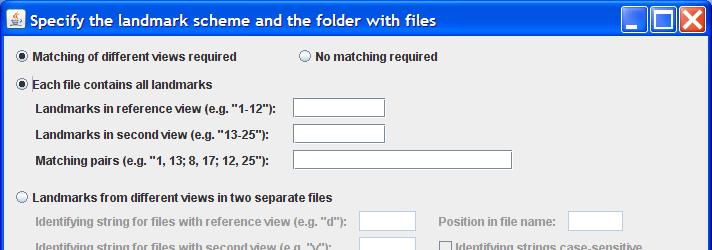
The first two text fields are for the ranges of landmarks in the reference view (no rotation will be performed) and the second view (these landmarks will be rotated to fit the reference view). Indicate the ranges by giving the first and last lines of the range, separated by a dash (e.g. "1-12" means that the first to 12th line are in the range). Note that the ranges for the two views must not overlap.
The third text field is for indicating landmarks that are included in both views and that will be used for linking them together. Enter each of these landmarks as a pair of line numbers: first the reference view and then the second view. The two line numbers of each pair are separated by a comma, whereas pairs are separated by semicolons. In each pair, the reference view is first, followed by the second view. At least three pairs must be indicated. In the example "1, 13; 8, 17; 12, 25", there are three pairs -- lines 1 and 13, 8 and 17 and 12 and 25 each contain the coordinates of one landmark in the two views. More than three pairs can be used (this should improve the quality of the match by averaging out some of the measurement error).
Finally, the folder with the data files should be selected using at the bottom of the dialog box. After clicking the Open button, the following new dialog box will appear, in which the user can specify the output file and which is described below.
If the landmarks are saved as separate files for the two views, select the button labeled Landmarks from different views in two separate files. The text fields in the centre of the dialog box will be activated:

The input elements are the identifying strings for the two views, for instance "D" and "V" or "dor" and "ven" for dorsal and ventral views. These strings can consist of one or more characters, but both must contain the same number of characters (the combination "d" and "ven" is therefore not permitted).
The position of this string in the filename is the number of the left-most character in the string, either counted from the left (positive numbers) or from the right (negative numbers). For instance, if a file name is "M0127 d2.csv", the letter "d" can be referenced with the number 7 as the seventh character from the left or with the number -6 as the sixth character from the right.
By selecting the check box, the recognition of identifying strings can be made case-sensitive (i.e., so that "D" and "d" are not considered the same).
Matching pairs are entered in a text field as pairs of line numbers in the two files. Each pair indicates the line number of the respective landmark in the file with the reference view, followed by that in the other view. The two line numbers of each pair are separated by a comma, and the pairs are separated by semicolons.
Finally, the folder with the data files should be selected using at the bottom of the dialog box. After clicking the Open button, the following new dialog box will appear, in which the user can specify the output file.
After the user clicks on the Open button in the interface described above, a new dialog box will appear in which the location and name of the output file can be specified.

Clicking the Save button will start the procedure. Both dialog boxes vanish when the program runs.
The output file contains the x, y and z coordinates of all the landmarks, starting with the landmarks in the reference view and then those of the second view. The landmarks used for matching are only listed once, in their respective places among the landmarks of the reference view.